See the official Steadicam Pilot product page at http://www.tiffen.com/pilot.html
When Garrett Brown was first developing the Brown Effect Stabilizer in the early 1970’s, the cameras he chose for his prototypes were then-current bantamweights like the Éclair ACL and the Arri 2C; it only made sense that if one were to cantilever weight off the body that it should be as minimal as possible. As it became obvious that his invention (now dubbed the Steadicam®) was not limited to running and jumping but also capable of capturing nuances of dialogue scenes, the system grew to accommodate full-size 35mm cameras and the job description of Steadicam operator came to include “must have the constitution of a bricklayer.”Eventually Garrett and his licensee (first Cinema Products, now Tiffen) realized that there was a market for lower capacity stabilizers to complement the broadcast and prosumer markets, and a progression of ever smaller rigs soon emerged. In 1990 the Steadicam JR was debuted, a handheld, foldable unit that floated the 8mm and VHS-C camcorders of the day with all of the elegance of its big brothers; the only limitation was the image quality of the cameras themselves.
That all changed when DV came along. For the first time, cameras that cost under $5000 could be taken seriously thanks to impressive image quality, 24p acquisition and pro-style image control, and the demand grew for support gear that was complementary in size and price. Even in the increasingly saturated market of handheld stabilizers (many “inspired by” the JR), the introduction of the Steadicam Merlin drew plenty of attention. Unlike its comparatively clunky competitors and predecessors, the Merlin was sleek, lightweight, precise and elegant. Meanwhile, the Steadicam Flyer had become the gold standard for arm-and-vest based operation, featuring a scaled-down version of the patented Iso-Elastic™ design of the larger Steadicam arms that handily (pun intended, with apologies) out-performed those sold elsewhere.
But as anyone who has handled even the feather-light Merlin for periods of time can tell you, a handheld stabilizer takes its toll on the “meat-based” support system that it relies upon, namely the operator’s own forearm. The logical next step was to further miniaturize the Flyer arm and vest for use with the Merlin, which relieved the burden while still retaining the possibility of handheld use. Building on that, Tiffen surprised everyone with the introduction of the Pilot, an “in-between” Steadicam which used the same arm and vest as the Merlin but with a beautiful new sled design and an attractive price point.
The first time I saw the Pilot, I thought, “Now that makes a lot of sense.” The skinny center post of the Flyer had been re-imagined in carbon fiber and widened for an improved handgrip; the battery and monitor were mounted on an adjustable horizontal post allowing each to be independently positioned, allowing for more flexibility in balancing than the Flyer’s lower section. The 10-pound capacity would neatly encompass all of the 3-chip cameras on the market even with the usual accessories onboard. And the option to add the Merlin weights as inertial supplements at the outer corners of the rig was a stroke of genius.
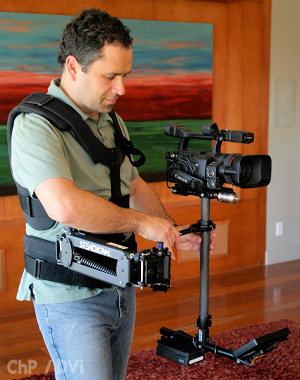
I got to play around with the Pilot a few times at trade shows and at a friend’s house, where I discovered that the device acted uncannily like my full-size rig, yet I could wear it seemingly endlessly. All of the fun, none of the pain! After a few glasses of wine and an hour of joyous galloping around in the back yard, they had to pry the rig off me. Later I borrowed a unit from Tiffen for a marathon shot on a feature, where I had reasoned that by using the Pilot for rehearsals I could save my energy for the actual takes (to be captured on the beefy Panavision Genesis with my full-size rig, weighing in at a cool 84 lbs) while still delivering a respectable image back to the monitors. Even with the size and weight differential between the two systems, the operating choices I had learned during rehearsals translated perfectly. Some time after this particular success, my old pal Garrett Brown loaned me his Pilot so that I could settle in and spend a bit of quality time with it and share my findings with you, dear readers. Herewith, said review:
The Steadicam® Pilot
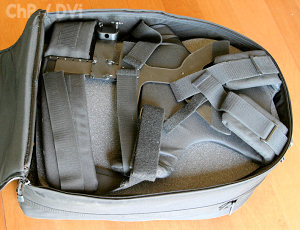
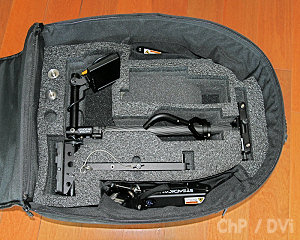
The Pilot comes in what is described as a “backpack,” but if forced to carry it around in such a mode, I’d be looking around for the nearest Sherpa. Opening the case reveals the vest, which is quite compactable as it is essentially a flat frame. Under this the components of the Pilot nestle in foamed compartments along with space for a Merlin if desired. One drawback is that these compartments are cut specifically enough that if the center post is extended or the lower components radically adjusted for a particular situation, the sled will not fit back into the case. If your shooting day required a lot of “company moves”, it would probably be easier to transport the components in their built mode rather than pack everything away as you might lose some of your settings. The arm has been designed to split into two sections via aircraft pin that cleverly doubles as part of the hinge mechanism, thus it travels in two separate compartments. There isn’t a dedicated slot for a charger or batteries, but the IDX package will fit into the zippered compartment on the top of the case. The Pilot can be ordered in IDX, Anton Bauer or AA battery pack versions, as well as a less expensive “Co-Pilot” version that only takes the AA batteries and has a smaller, 3.5 inch monitor.My camera of choice was the Canon XH A1, which at 4 lbs is on the lighter side of cameras that the Pilot will support. I mounted the A1 to the supplied camera plate via included screw and provided “anti-rotation” pin that mates with the small hole fore of the standard thread common to most camcorders. Sadly the supplied pin was smaller than the pilot hole on my A1, and the camera still had the tendency to rotate slightly even when the camera screw was fully tightened. Some double-sided tape on the bottom of the camera would have improved things, or a thin layer of rubber. The plate then fastens to the top stage via 4 captive thumbscrews, which are spring-loaded and admittedly a bit funky in feel; I thought I had broken something when releasing them but they are just an unusual design. The setup appears reminiscent of the Glidecam 2000/4000 top stage but while those products rely on these screws to adjust fore/aft and side/side for balance purposes, on the Pilot they simply mount the plate to the camera platform. Many people like to use the rather nice Bogen quick release assembly (sold separately), which is very handy if you have a companion receiver on your tripod and will make switching between shooting modes a real breeze.
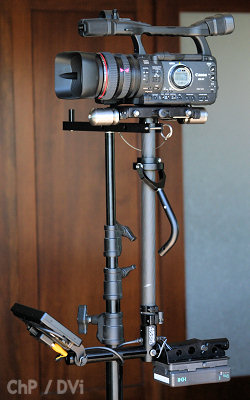
You will need a beefy light stand (I recommend the very nice Steadistand available from Tiffen) but the Pilot does include a docking bracket to store the rig between takes and aid with balancing. The sled is secured into the bracket via a sliding pin that I found sticky and difficult to guide quickly, something of a shame as this is a procedure that one will perform many times during a shoot. The docking bracket has two mounting holes, one of which will project the rig far enough away from the stand that continuous spin balancing is possible–a very thoughtful addition. Use common sense when balancing so that the stand doesn’t tip. Position the docking bracket over a leg of the stand and drape it with a sandbag or similar ballast (that hung-over PA passed out in the corner, for instance).
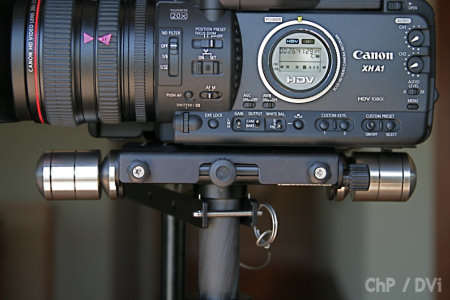
Above: All supplied weights up on the top stage. Also shows fore/aft and side/side controls, and detail of docking pin.
The Pilot has two knobs for adjusting fore-and-aft and side-to-side balance, something that will be a revelation to those who have previously used rigs that require loosening a series of screws, physically moving the camera plate, and re-tightening for each adjustment. With the Pilot you simply turn the knob and immediately judge the effect on balance with minimal fuss. Thus if you want to make on-the-fly adjustments (such as trimming for headroom or severe tilts), it is easy to do with one hand. I have heard from some owners of other systems that they have had to develop a whole series of techniques to fine-tune their top stages, such as the Nudge, the Coax and most frequently, the Don’t Bother, Just Suffer.
Move on to Page Two of this article.
Move on to Page Three of this article.

