REDs for the rest of us?
The $1995 Blackmagic Cinema Camera and $995 Blackmagic Pocket Cinema Camera are interchangeable-lens, single-sensor cameras with raw recording capability, capturing wide-dynamic-range, log-encoded images to CinemaDNG files. They also record ProRes422(HQ) and (for the Cinema Camera) DNxHD Quicktime files using either log or Rec.709-compatible encoding, for those preferring a more direct, edit-friendly format.
The cameras eschew optical low-pass filters, giving unusually crisp images, though at the risk of increased aliasing and demosaicing artifacts.
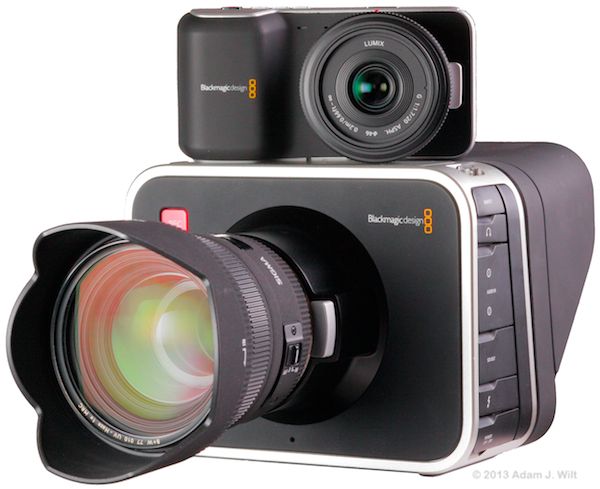
The cameras also pay no heed to existing design directions: the Cinema Camera looks like nothing so much as a studio viewfinder with a lens mount smack-dab in the front, while the Pocket Cine Cam resembles a small point-and-shoot still camera.
Their controls and menus will gladden those yearning for the operational simplicity of film cameras, and frustrate those used to tweaking arcane camera settings while watching status displays worthy of an F18’s HUD.
Different? Darned right. These cameras don’t fit neatly in any conventional categories; they are rules unto themselves. Force them into existing molds and they will baffle you; exploit them for what they are and you can get some amazing images from them. Like the rulers of Sigma Draconis VI, these cameras can be givers of pain and delight – no wonder that Michael Reichmann’s review of the Pocket Cine Cam is subtitled “The Agony and the Ecstasy“.
The cameras (along with the announced, but not yet shipping, Blackmagic Production Camera 4K) share many characteristics while maintaining distinct personalities, so it makes sense to review ’em together.
Design and Handling
Cinema Camera
The Cine Camera is available in two versions, one with an active Canon EF mount, the other with a passive MFT (Micro Four Thirds) mount.
The cameras offer an interesting tradeoff: the EF allows electronic iris control for modern EF lenses, but its deeper lens mount (44mm flange depth) limits the number of mount adapters that can be used; mostly EF, Nikon F, and possibly some PL lenses, if they don’t protrude too much behind the mounting flange.
The MFT model with its 19.25mm flange depth lets you attach a wide variety of lenses via adapters, but its lack of electronics prevents aperture control with the vast majority of MFT-native lenses.
I opted to review the EF model; the MFT version operates identically, save for lack of iris control.
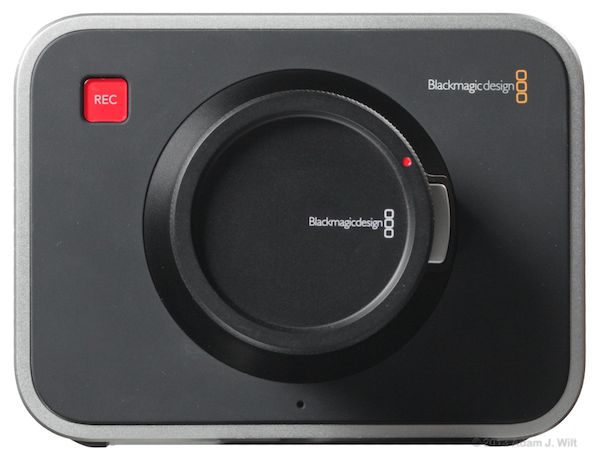
From the front, the Cine Cam is a rounded rectangle with a lens mount in the center. It’s about 6.5 inches wide, 5 inches tall, and 4.5 inches long (166mm x 126mm x 114mm). The frame is a silvery, matte magnesium alloy, while the front surface is a grippy rubber surface surrounding the black metal lens mount. A red REC button in the upper left corner, a silver lens-release button, the Blackmagic design logo, and a tiny hole below the lens mount for the built-in mono microphone, are the only distinguishing features.
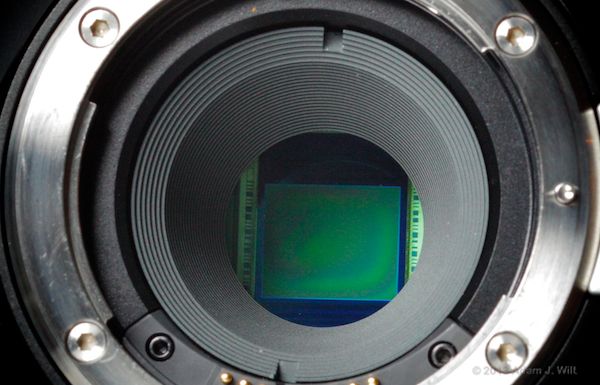
The 15.81mm x 8.88mm CMOS sensor – about 36% smaller than Super35mm / APS-C, some 10% smaller than a four-thirds sensor, and roughly 25% larger than Super16mm – sits comfortably behind an anti-reflection baffle.
[Note: all my comparison numbers are approximate, because format dimensions are rather, um, flexible. “Super35mm” means one thing to film guys, and different things to all the different digital cameras advertising “Super35mm” sensors. Similarly, the exact dimension of a four-thirds sensor’s active 16×9 area depends on whether it’s a multi-aspect sensor (GH1 and GH2) or not (GH3), or it’s an AF100. So if you’re shooting with a 50mm on an Alexa, you’ll want something near 35mm on the Cine Cam, but whether it’s 32mm or 37mm, deponent sayeth not. For more exact numbers, check out Abel Cine’s chart and/or calculator. (That calculator says you’ll be wanting a 32.6mm lens, by the way.)]
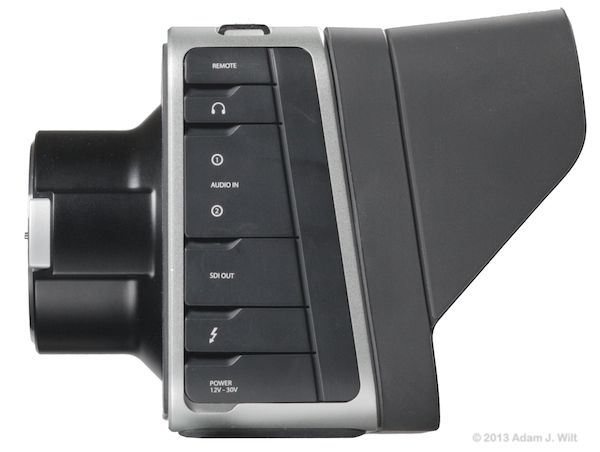
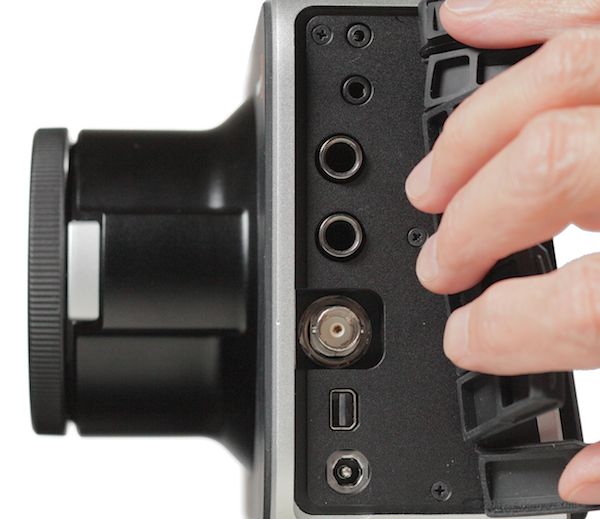
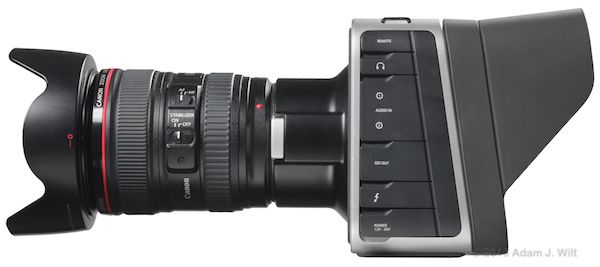
The left side view reveals the tapering wedge shape of the body. Hinged rubber covers shield the camera’s I/O connectors. A dark gray viewfinder shade is supplied with the camera; you can remove it if you so desire.
A 2.5mm LANC connector allows remote start/stop, and focus / iris adjustments with compatible lenses (on the EF model, not the MFT model). My decades-old RM-95 refused to perform when plugged in, neither controlling the camera nor displaying anything on its LCD status panel.
There’s a standard 3.5mm stereo headphone jack. Dual 1/4″ phone jacks let you connect mic- or line-level inputs. A BNC provides a 10-bit, 4:2:2 HD-SDI output with embedded audio. A Thunderbolt port lets you connect the Cine Cam to a PC or Mac for monitoring using the supplied UltraScope software, or offboard uncompressed recording using Blackmagic’s Media Express software, also supplied.
Finally, a standard 5mm coax power connector accepts DV voltages from 12-30V. I had a universal wall-wart adapter which plugged right in (tip-positive, shell-negative, if you want to try this at home). The power feeds into a built-in, 90-minute battery, which may not sound like much, but the camera happily operates while external power is being connected or disconnected. You can move between external batteries, AC adapters, and the internal battery without glitching or dropping frames, so the built-in acts as a buffer or backup battery as much as a primary power source.
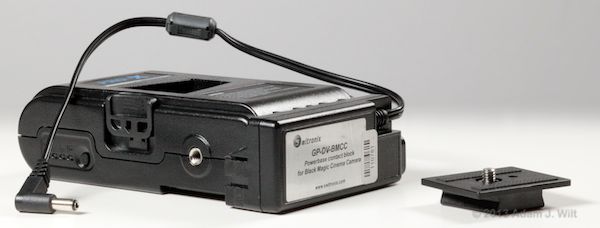
Blackmagic also sent along this Switronix PRO-X Powerbase 70 14.8V Li-ion battery, with an integrated mounting plate and a Switronix GP-DV-BMCC contact block adapter, and an AC adapter that charged the battery through an integral D-Tap connection. This battery powers the Cine Cam for hours. How many hours? I don’t know, because I ran out of patience before this battery ran out of juice. Over at Planet5D they say it runs the camera for six hours, which I can well believe.
Here’s the camera with the ubiquitous Canon 24-105mm f/4 EF-L lens on it.
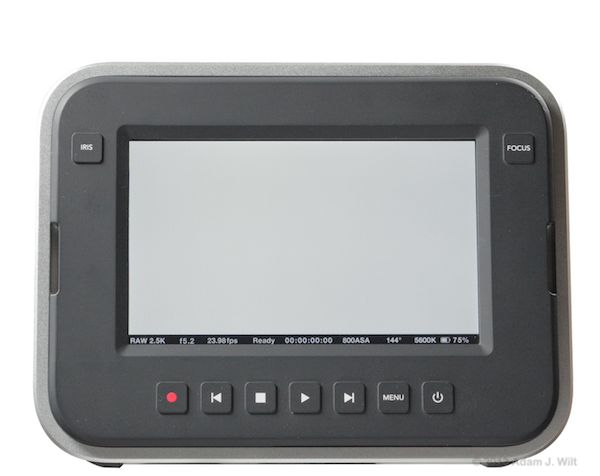
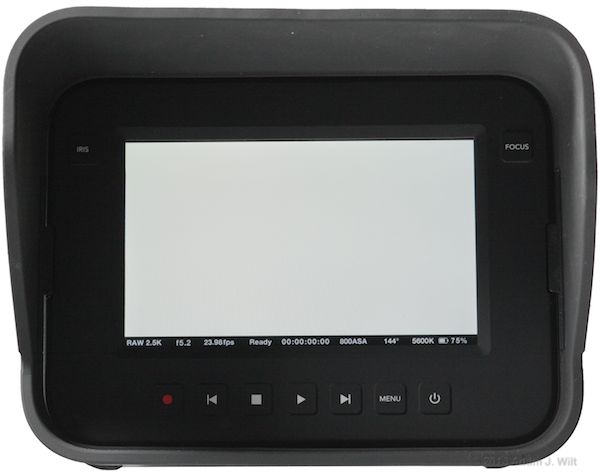
The rear of the camera, without its removable sunshade. The back panel is made of the same rubbery material as the front.
Molded-in, raised buttons conceal satisfyingly clicky switches. IRIS auto-adjusts the lens iris on electronic-aperture lenses. Pressing FOCUS toggles a peaking signal. The red record trigger replicates the button on the front panel; the MENU button displays and hides the menu; and the power button turns the camera on when pressed, and off when pressed and held in. The four playback controls do pretty much what you’d expect – previous clip, stop, play, next clip – and in addition, the previous and next buttons adjust lens iris in quarter-stop steps.
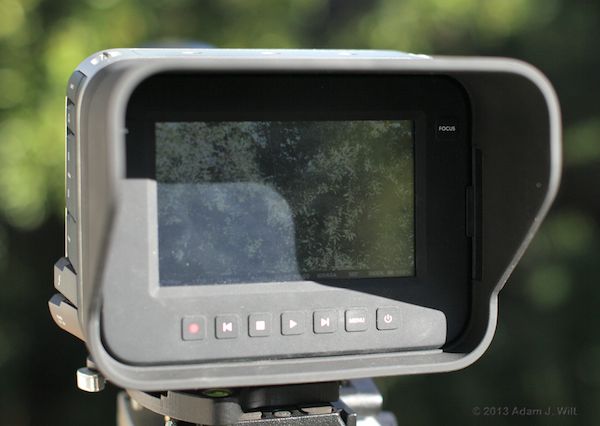
The sunshade is attached by pressing its tabs into the slots on either side of the back panel. Once fitted, it remains securely in place, and it does a surprisingly good job of improving screen readability, though it also makes it a bit trickier to activate the now-recessed buttons.
Note the status line at the bottom of the 5-inch, 800×480 touchscreen LCD:
- RAW 2.5K – this shows either RAW (with the unfortunately incorrect 2.5K resolution figure, of which more will be said later on) or ProRes or DNxHD, as appropriate.
- f5.2 – the current lens aperture (for lenses that communicate with the camera; EF model only).
- 23.98fps – current frame rate.
- Ready – recording status: Ready, REC, Disk Full, or No SSD. When the SSD is getting full, REC and Disk Full will alternate. If frames are dropped, REC will flash. In playback mode, playback icons are shown.
- 00:00:00:00 – running time for the current clip.
- 800ASA – the current ISO rating.
- 144º – shutter angle.
- 5600K – color balance.
- battery icon and level – 100%, 75%, 50%, 25%, or (presumably) 0%.
The touchscreen itself serves as a control point: tap it once to bring up a metadata panel (the “slate”), where you can set reel, scene, shot, and take numbers (the latter three can be set to auto-increment), enter a camera angle such as “wide” or “CU”, and enter a project name and keywords using an onscreen keyboard. Tap the screen twice to zoom in, pixel-for-pixel.
The screen taps need to be in the central part of the screen to register, in about the central 2/3. I also found the taps “backwards” to my taste; I often want to zoom in and out, and only rarely need the slate, yet I frequently found myself staring at the slate when I just wanted to check focus. Fortunately the slate won’t suddenly appear if you’re recording when you tap the screen, but still, I’d rather use a single tap – especially while recording – for focus checking.
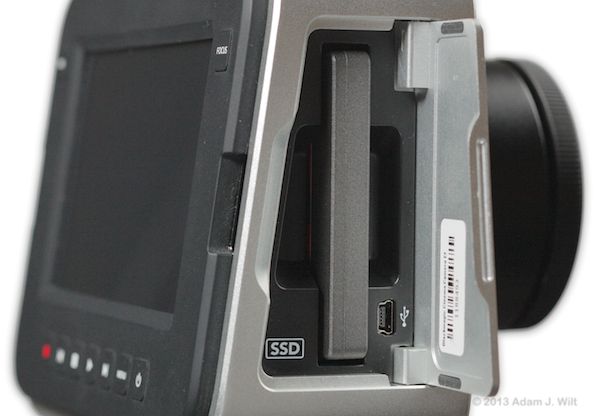
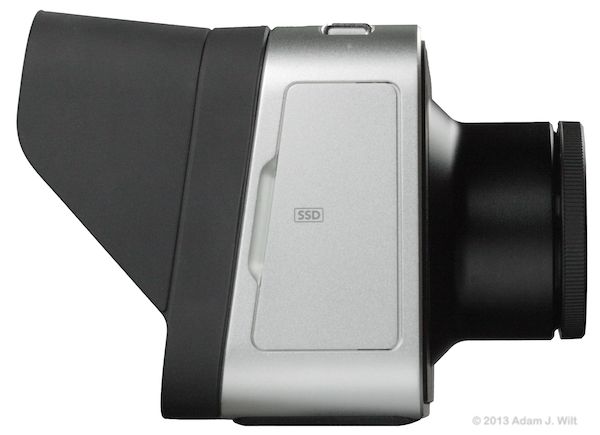 The right side of the camera has the door to the SSD compartment.
It covers the slot for a standard 2.5″ SSD, and a USB port for firmware updating using Blackmagic’s Camera Utility software. The SSD simply slides in and is pressed into the SATA and power connectors; the friction of those connectors, and the closed door, are all that retain the SSD in place.
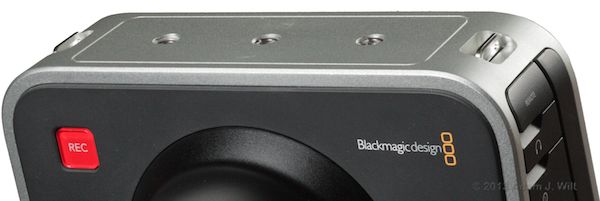
The top of the camera has three 1/4″ mounting points. The threads are hard-plated steel, not simply holes tapped in the softer alloy shell, so they’re robust and durable. Strap lugs on either side let you sling the Cine Cam ’round your neck, just like a tourist! An impressive-looking strap comes with the camera for that purpose.
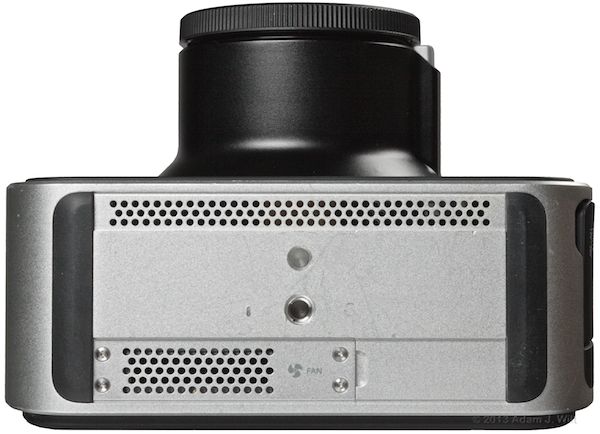
The base of the camera has rubber feet at either side, a 1/4″ tripod socket, and an anti-rotation hole in front of it, and grilles for air movement. Air is drawn in through the wider front vent, and expelled by a constant-speed internal fan, to which the rear vent is affixed. This fan is user-replaceable should it fail. The fan makes a constant, low-level whooshing noise, which might be problematic for close-miking on a soundstage but is otherwise unobjectionable. The internal playback speaker also emits sound through these grilles.
Both grilles are recessed slightly so that air can get in even with the camera sitting on a flat surface or bolted to a tripod head. Do be careful putting the camera on a soft surface like a blanket or a rug, though, for fear of blocking airflow.
Overall, fit and finish are superb. There’s a feeling of elegance to the whole rig, as if Jony Ive at Apple had designed it (albeit at a somewhat lower price point than the last camera he worked on). The camera is a solid lump in the hand, with no squeaks or rattles; doors and covers fit precisely; buttons and lens release lever work smoothly and offer good tactile feedback. The rubberized front and rear surfaces offer a good grip and nicely set off the matte silver frame. The metal can show the effects of wear (look at the base, above, which shows some scuffing from the camera’s previous journeys), but that’s pretty much unavoidable with a bare-metal surface.
On a tripod, the camera is very well behaved. The large LCD is easily viewable, and the sunshade works remarkably well, much better than I expected it to. It’s very much like using a nice, big studio finder on a tripod… where the camera itself is just a bump on the front of the finder.
Indoors, or outside on overcast days or in the shade, the screen is perfectly readable and more than bright enough. Full afternoon sun on the LCD panel makes it harder to view (and does a great job of highlighting smeary fingerprints), but the image is still legible enough for aiming and focusing. The screen’s surface is glossy, so aside from the occasional direct reflection the image is fairly resistant to washing out.
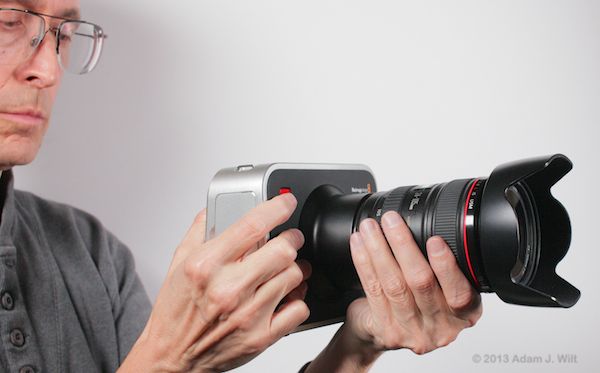
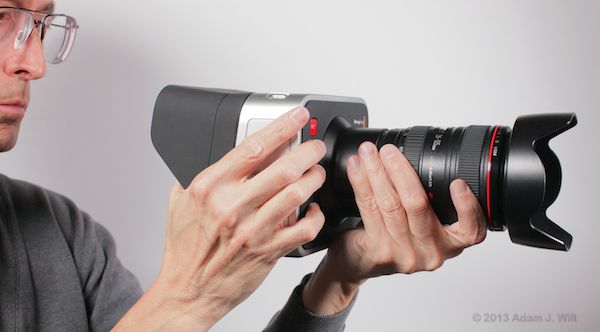
Handheld ops are a different story. The camera, sans glass and SSD, weighs in at about 3.75 lb (1.7 kg), and the trapezoidal profile, tapering towards the top, means it’ll slip out of your grasp instead of wedging itself more firmly into your hand. Still, with right hand in a death grip on the body, and left hand under the lens, somewhat wobbly handheld is possible, if not particularly enjoyable.
Put the sunshade on, and you can no longer reach the front REC button while holding the camera, though the lip of the shade makes the camera easier to grasp.
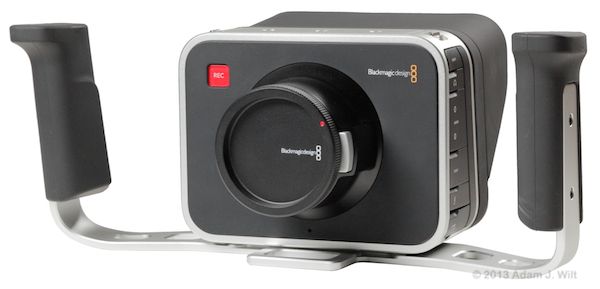
Blackmagic makes a stylish handle set for an additional $200:
The handles bolt into the bottom tripod socket, but don’t provide a socket of their own. A small foot sticks forwards, so the assembly is less likely to fall forward with a heavy lens attached.
The handles are perfectly comfortable, but their wide stance means you need both hands fully engaged at all times; you can’t let go with one hand without the camera sagging in a Dutch tilt of the sort that made German Expressionism famous. If you plan to start or stop recording, adjust focus, etc. while maintaining a level horizon, you’ll be wanting an assistant.
In short, the Cine Camera is a boon to purveyors of cages, baseplates, rigs, braces, shoulder stocks, and all manner of support kits, as it’s simply not designed with handheld in mind.

